Introduction
Recently I built a simple service “BlogSearch” for searching blog posts on my blog https://mincong.io. Today I want to share with you the architecture of the whole project, including the frontend, backend, and devops aspects of the project. BlogSearch is built on top of Java, Elasticsearch, and Jekyll.
I built BlogSearch because I want to learn more about search. I worked with Apache Lucene when I did my internship project at Red Hat (link) and worked with Elasticsearch when I joined Datadog (link). That’s why I want to continue my journey in this domain.
Frontend
The frontend of the BlogSearch project consists of two parts: the search bar used by end-users and the Jekyll plugin for indexing new posts used by the blogger (me).
Search Bar
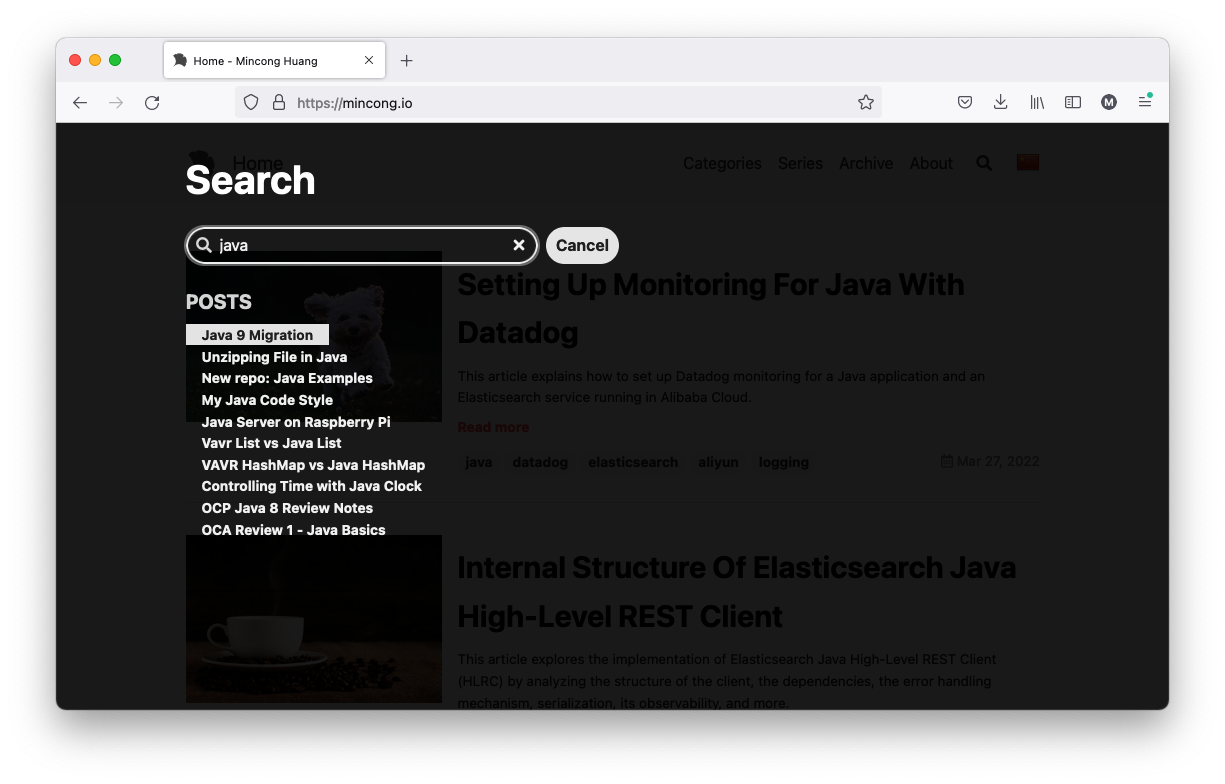
The search bar is an existing feature provided by the Jekyll TeXt Theme. When you type a keyword, it gives you a list of results that match the query:
The default implementation uses the static data stored as a JavaScript variable
(TEXT_SEARCH_DATA), constructed at build time (jekyll build). In my case,
I changed the search provider implementation to perform remote calls to the
backend service at runtime.
function remoteSearchByQuery(query) {
  var i, j, key, keys, cur, _title;
  const url = 'https://search.jimidata.info/sites/mincong.io/posts/search?' + $.param({
    q: query
  });
  let start = Date.now();
  $.ajax({
    'url': url,
    'success': function(data) {
      // display results
    },
    'error': function(data) {
      // handle error
    }
  })
}
The implementation also changed from synchronous to asynchronous because we don’t know when the result will be returned by the backend service. If you need more details, visit https://github.com/mincong-h/mincong-h.github.io/pull/55.
Jekyll Plugin
How to create or update documents in BlogSearch?
Another change in the frontend is the Jekyll plugin. The goal of this plugin is to create or update Jekyll blog posts in BlogSearch. As a Jekyll Plugin, it has access to all kinds of metadata related to the site, the posts, and the pages. Also, it is invoked only at build time, so this is ideal for making changes – it interacts with the backend exactly once when the posts are created or updated.
There are also other alternatives to retrieve blog posts, such as via the feed of the website or parsing the HTML. Reading the feed requires a custom parsing mechanism on the backend side; the feed only contains the N most recent posts; the backend needs to schedule the parsing. Parsing the HTML means that we need to know exactly what the structure looks like and it is reverse-engineering. Here is an example implementation from Ryan Harrison: elastic-jekyll.
Going back to the Jekyll plugin, there are multiple types of Jekyll plugins: generators, converters, commands, tags, filters, and hooks. Here I am using the “hooks”, which provide fine-grained control to extend the build process. Here is how does it look like (it’s written in Ruby):
# _plugins/hooks/site/post_write/blogsearch.rb
require 'net/http'
require 'uri'
require 'json'

Jekyll::Hooks.register :site, :post_write do |site|
    # ...
    Jekyll.logger.info "Updating blog posts to BlogSearch..."
    username = ENV["JIMI_USERNAME"]
    password = ENV["JIMI_PASSWORD"]

    site_info = Net::HTTP.get URI('https://search.jimidata.info')

    site.posts.docs.each { |post|
        url = post.url
        title = post.data["title"]
        content = post.content

        pos = post.id.rindex('/') + 1
        postId = post.id[pos..-1]  # hack: remove prefix
        uri = URI.parse('https://search.jimidata.info/sites/mincong.io/posts/' + postId)
        Jekyll.logger.info uri

        http = Net::HTTP.new(uri.host, uri.port)
        http.use_ssl = true

        headers = {"Content-Type": "application/json"}
        body = {"title" => title, "url" => url, "content" => content}.to_json

        request = Net::HTTP::Put.new(uri.request_uri, headers)
        request.basic_auth username, password
        request.body = body

        response = http.request(request)

        Jekyll.logger.info response.code + " " + response.body
    }
end
What it does is basically submit a POST HTTP request for each blog post on the website. It’s done using basic authentication over HTTPS. Here is the excerpt, the actual implementation is a bit more complex than that because of the feature flag to control the enabling of the behavior.
Backend
The backend service mainly consists of 3 parts: the write path, the storage, and the read path.
Write Path
Indexing new documents are done using the following endpoint:
PUT /sites/{site}/posts/{postId}
Internally, the backend service uses Elasticsearch API client to interact with Elasticsearch using RESTful API.
try (var transport = newRestClient()) {
  var client = new ElasticsearchClient(transport);
  var operations =
      posts.stream()
          .map(
              post ->
                  new UpdateRequest.Builder<JekyllBlogPost, JekyllBlogPost>()
                      .index(website)
                      .id(post.url())
                      .doc(post)
                      .docAsUpsert(true)
                      .build())
          .toList();

  for (var request : operations) {
    var response = client.update(request, JekyllBlogPost.class);
    logger.info("post {} updated", response.id());
  }
} catch (IOException e) {
  // ...
}
Storage
The storage is handled by Elasticsearch. Currently, it’s in version 7.16. Since this is a small project, I only use Elasticsearch in a single node to reduce the cost of the operations. The schema is defined implicitly when the first document is created. Right now it contains 3 fields: the URL, the title, and the content of the post.
// curl -ns localhost:9200/mincong.io/_mappings | jq
{
  "mincong.io": {
    "mappings": {
      "properties": {
        "content": {
          "type": "text",
          "fields": {
            "keyword": {
              "type": "keyword",
              "ignore_above": 256
            }
          }
        },
        "title": {
          "type": "text",
          "fields": {
            "keyword": {
              "type": "keyword",
              "ignore_above": 256
            }
          }
        },
        "url": {
          "type": "text",
          "fields": {
            "keyword": {
              "type": "keyword",
              "ignore_above": 256
            }
          }
        }
      }
    }
  }
}
Read Path
For the read path, currently, it’s very simple as well. The backend service performs a simple query string query over the searchable fields: title and content to search for the relevant results. According to the documentation of Elasticsearch 7.16:
Returns documents based on a provided query string, using a parser with a limited but fault-tolerant syntax.
This query uses a simple syntax to parse and split the provided query string into terms based on special operators. The query then analyzes each term independently before returning matching documents.
While its syntax is more limited than the query_string query, the simple_query_string query does not return errors for invalid syntax. Instead, it ignores any invalid parts of the query string.
Here is the Java code for the implementation:
try (var transport = newRestClient()) {
  var client = new ElasticsearchClient(transport);
  var sqs =
      new SimpleQueryStringQuery.Builder()
          .query(queryString)
          .fields(JekyllBlogPost.SEARCHABLE_FIELDS)
          .build();
  var query = new Query.Builder().simpleQueryString(sqs).build();
  var request = new SearchRequest.Builder().index(website).query(query).build();
  var response = client.search(request, JekyllBlogPost.class);
  logger.info(
      "Found {} documents (took {}ms)", response.hits().total().value(), response.took());
  var documents = response.hits().hits().stream().map(Hit::source).toList();
  return JekyllSearchResult.newBuilder().posts(documents).build();
} catch (IOException e) {
  // ...
}
DevOps
Besides the changes in the frontend and backend, there are also other tasks to handle that are related to the infrastructure and continuous integration. Here are some of them. By the way, I choose Alibaba Cloud as the cloud provider because I have an audience from mainland China. I think using Alibaba Cloud may be the best option for providing services to both the worldwide readers and the Chinese readers using a single website.
DNS
Currently, the backend server is hosted under the domain https://jimidata.info.
Jimi stands for Jingwen and
Mincong, it’s a personal domain that I use for
side projects for my wife and me. Choosing info as a suffix because it’s one of
the cheapest domains we can buy. It cost $4.16 for one year. I bought the
domain from Namecheap and redirected the site to Alibaba Cloud:
ns7.alidns.com
ns8.alidns.com
You can also find the information here:
$ dig https://jimidata.info

; <<>> DiG 9.10.6 <<>> https://jimidata.info
;; global options: +cmd
;; Got answer:
;; ->>HEADER<<- opcode: QUERY, status: NXDOMAIN, id: 44930
;; flags: qr rd ra; QUERY: 1, ANSWER: 0, AUTHORITY: 1, ADDITIONAL: 0

;; QUESTION SECTION:
;https://jimidata.info.		IN	A

;; AUTHORITY SECTION:
info.			406	IN	SOA	a0.info.afilias-nst.info. hostmaster.donuts.email. 1653568699 7200 900 1209600 3600

;; Query time: 73 msec
;; SERVER: 223.5.5.5#53(223.5.5.5)
;; WHEN: Thu May 26 14:46:04 CEST 2022
;; MSG SIZE  rcvd: 118
Once the DNS is managed by Alibaba Cloud (instead of Namecheap), I also needed
to add the DNS record to Alibaba Cloud DNS. I added three A records: @, www,
and search, respectively for web browsing and search-related usage from
https://mincong.io.
Reverse Proxy
In this project, I also used Nginx as a reverse proxy before serving the requests in the backend server. This is mainly useful for serving requests in HTTPS. More precisely, I used certbot to manage the configuration and automatic renewal of the certificates. Here is an excerpt of the configuration:
server {
    server_name jimidata.info;
    root /app/nginx/html;
    index index.html;

    listen 443 ssl; # managed by Certbot
    ssl_certificate /etc/letsencrypt/live/jimidata.info/fullchain.pem; # managed by Certbot
    ssl_certificate_key /etc/letsencrypt/live/jimidata.info/privkey.pem; # managed by Certbot
    include /etc/letsencrypt/options-ssl-nginx.conf; # managed by Certbot
    ssl_dhparam /etc/letsencrypt/ssl-dhparams.pem; # managed by Certbot
}
Monitoring
I use Datadog to monitor the entire BlogSearch project. I chose Datadog because it covers many aspects of the stack: logs, APM, profiling, infrastructure, alerting, network, error tracking, RUM, etc. Another major reason is that it’s free for employees. Here is a trace showing the interaction between the user and the backend:
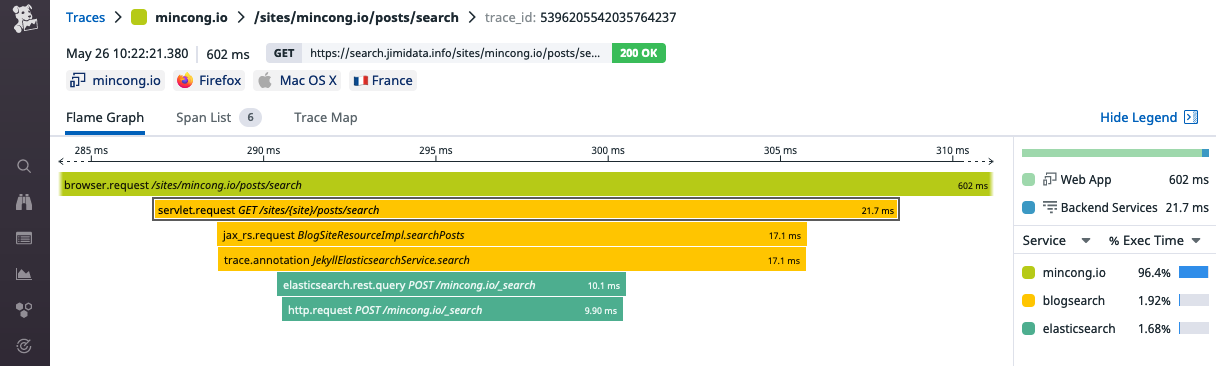
If you are interested in using Datadog’s product, I also wrote another blog post about setting up monitoring for Java with Datadog which contains much more details. I talked about cloud provider’s integration, setting up Datadog agent, integration for Elasticsearch and Java, application performance monitoring, profiling, pricing, etc.
CI
Continuous integration is an important part of development. Since I am working as a single person, it’s essential to get some help from the CI so that I don’t have to worry about this part. This is done by using GitHub actions. There are mainly two parts there: the frontend and the backend.
- Frontend. For the frontend (Jekyll), GitHub pages do not accept custom plugins for security concerns (StackOverflow). So I had to build my GitHub actions to mitigate this problem. I did it when implementing the internationalization (i18n) of my blog, see “Custom internationalization (i18n) with Jekyll > Task 4: Modifying build and deployment”
- Backend. For the backend, I implemented some actions so that whenever a
PR is merged into the
prodbranch, a new build will be triggered and a new Docker image is generated and pushed to Alibaba’s Container Registry (ACR). I wrote an article about GitHub actions and ACR last year but it’s in Chinese: GitHub Actions 持续集成阿里云容器镜像服务(ACR).
Currently, I am using the ACR for personal usage. Compared to the enterprise plan, the limit is 3 namespace and 300 repositories. It does not have global distribution, customized domain, or on-demand image loading. But it’s good enough for a small project and it’s free. There is also an official GitHub action for ACR: aliyun/acr-login.
Conclusion
In this article, we talk about the entire architecture of BlogSearch, including the frontend, the backend, and the DevOps aspects of the project. To be honest, I didn’t expect it to be so complex at the beginning. But it was fun to discover them and I really enjoyed the process there! Interested to know more? You can subscribe to the feed of my blog, and ollow me on Twitter or GitHub. Hope you enjoy this article, see you the next time!